I have been on a weeks worth of annual leave since last Tuesday as my Dad, his partner Norma, and Kim’s mum Pam are visiting. A full house one would say.
As on previous visits, Dad and I always have a project to keep us busy around the suburban farm, and this visit is no exception. Today we started two guttering projects, that I have been chaffing at the bit to get moving on as I had a rainwater tank just sitting in the carport for ages. We aimed to get at one finished today, however as the post will attest, we mostly completed both projects in one day. Last Friday, we pre-purchased one 6 metre and two 3.6 metre lengths of 115mm quad galvanised guttering and one 6 metre length of non-lead PVC 90mm storm water pipe. Along with gutter ends, downpipe outlets, elbow joints, a angle grinder, a pop-rivet gun, and a few odds and sods like screws and silicone it came to a total cost of A$260 (good price) plus $50 delivery fee (rip-off).
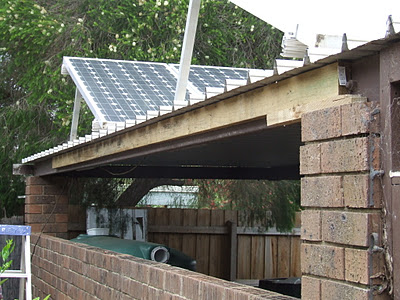
We started at 7.30am, got all the tools together which took about 30 minutes, then we got stuck into the job. Firstly we had to put up a couple of lengths of structural pine to pad out the beam that we were hanging the gutter on. We fastened it to the steel beam with 60mm self tapping screws with hex head spaced every 70 cm. Click on any of the photos to enlarge.
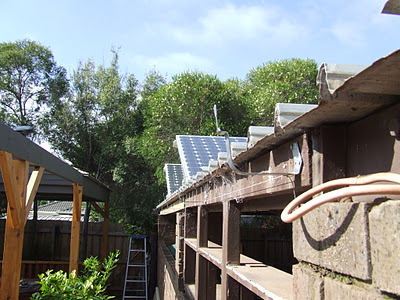
Then we ran a string line and hung a little spirit level on it to make sure that we had sufficient drop to the drain pipe at the other end. We mounted the gutter clips onto the wood with the bottoms level with the string line and fastened with three 20mm wood screws.
Here is a close up of our handy work. Note the string line. Time for a tea break at 9am.
Once we were happy with the gutter clips, it was time to make up the gutter. We took the 6 and 3.6 metre lengths and slid the smaller one inside the larger one until we had a 9.09m length of guttering. Then we pop-rivetted on the ends, the outlet and the two lengths together, all with lashings of silicone to seal it all without leaks.
After much ado, it was time to mount the gutter and fix it in place.
We had to push it over the neighbour’s fence to get it from the carport to the other side where we were mounting it, which was a little tricky, but it was quite light, so it was not too difficult.
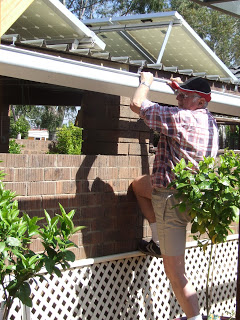
Here is Dad (John) standing in my new mandarin tree putting the gutter in place. We found that you have to turn the gutter sideways into the gutter clips, then swivel it right side up.
In this shot I am checking the line of the gutter to makes sure it was sitting in the clips properly. Note the outlet on the gutter near my glasses.
Once in place we bent over the top of the gutter clips with pliers and were satisfied with the work. Time for a quick trip to the hardware shop for a few bits of 90mm elbows that we forgot and then we broke for lunch at 1pm. A quick nap until 3pm and then back to work on the plumbing. This was the first time that I had worked with storm-water pipe, so Dad showed me the ropes.
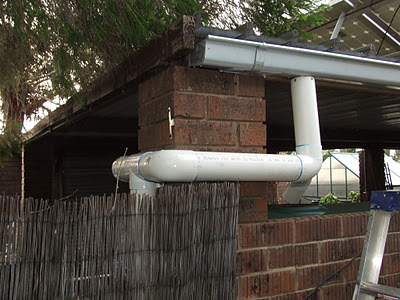
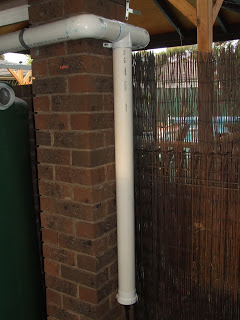
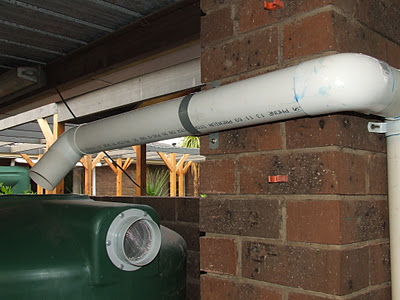
As I wanted to fit a first flush diverter, we had to go around the brick pillar then to the outlet. We cut the pipe with a normal wood saw, which was quite easy. We made sure that we measured every piece, fitted it first to make sure it was correct, then took it apart and glued it together with the blue solvent cement.
Here is the pipe connecting the the first flush diverter.
The purpose of the first flush diverter is to catch all the dirt and leaves off of the roof and into this long pipe. Inside it is a plastic ball that floats up as it fills with water, which then blocks the pipe, and clean water flows into the rain-water tank.
We used dynabolts into the brick to fasten the pipe clamps to the wall. When full the diverter is about 20kg so it needed to be fastened strongly.
The top of the tank has a mesh filter to prevent any mosquitoes and leaves that sneak past the diverter from falling into the tank. Note that we fitted a mesh screen and proper outlet so that the overflow can be fitted tomorrow. The hole that had been pre-cut by the tank manufacturer was too small, so I spent a good 30 minutes filing the hole bigger so that the outlet would fit properly. We then glued in the mosquito mesh to stop the beasties from breeding in the water.
After that we put the garden hose into the far end of the gutter and it all worked perfectly, running to the outlet end, down into the first flush diverter and then into the tank. All good, except for one small leak around the gutter outlet. Tomorrow we will fix that leak with a little more silicone sealer.
Then we sealed off the other end of the tank with a cap and glued it in place with silicone instead of solvent which will be easier to remove. This is so that when I purchase another tank, we can connect it at with a wider pipe at the top instead of using the tap at the bottom.
Speaking of taps, this is how we fitted it back last Thursday. The tank came with 25mm holes pre-threaded, to which we fitted the tap. Then we fitted a 25mm to 20mm reducing pipe and connected an ordinary garden hose fitting. This was only short term, as I will be fitting 19mm irrigation pipe to it at a later time. The reason we had to fit the garden hose connection was because I discovered that my other tank had a tiny crack in it, and it was leaking water. As the other tank was full, the pressure was causing the crack to expand, so we had to work quickly to avoid disaster. We connected the two tanks together so that we could siphon the full one to the empty one as the new tank was a bit lower than the full existing tank. Overnight we saved about 1500 litres of water, and I drained the remainder into the veggie patch. Then I patched up the hole with some silicone, which will hopefully fix the issue.
Anyway, we moved on to the chook house to fit some guttering to Cluckingham Palace. It was much easier than the carport roof, as it was only 3.13 metres long. We used the angle grinder with a cutting wheel attached to cut the remaining length of gutter to size, fitted the ends and the outlet and carried it around to the chook house. We then mounted the gutter clips using a string line, and then put up the gutter.
We only needed three gutter clips for this sized gutter as there is not much roof area for collection and not much weight in the gutter due to its length.
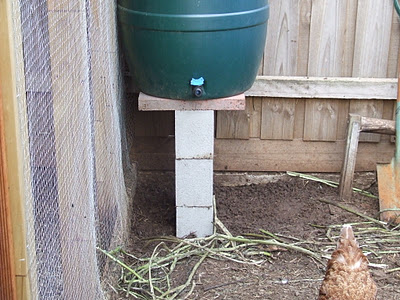
We then made a stand for the 210 litres rain barrel. As I didn’t have many bricks, it is a unique design and perfectly balanced until of course the chickens under mine it with their digging.
To combat any disaster, we secured it with some galvanised change that I had laying around. It should stay in place even when full. We connected the down pipe using a 22.5 degree elbow joint with the pipe extending about 4cm into the barrel.
Very happy chickens, and soon to have their own water supply harvested from their own roof. Tomorrow, Dad and I will be fitting the chicken watering system including the chicken nipples! We will also be fitting the overflow pipe to the big tank, connecting an overflow pipe for the rain barrel and running it out of the chicken run into the back of the shed or even another rain barrel, savings permitting, and finally making a new hard stand for the now empty original tank to prevent further cracking.
A hard days work, but with big rewards. We will be able to water the chooks, and collect an additional 1800 litres of water off of our carport/solar power station roof. After we had finished for the day, Kim commented that it only took me 11 years to put a gutter up on the carport! Better late than never, and now we will be able to render the carport wall that faces the pool area, but I will leave that for another few weekends!









I’ve really enjoyed reading your blog over the past several months. My family and I live in Texas and just found out that my husband’s company may be transferring him (and us) to Brisbane in a few months. It’s encouraging to read so many Australian bloggers who are conscious of the environment and conservation.
Here in the US, growing your own vegetables, raising a few chickens, or drying your clothes outside is seen as extreme. Heck, where we live now, we aren’t even allowed to have a chicken, a clothesline (we put one up anyway) or a visible water tank on our property.
We are excited to make the move and look forward to experiencing life in Australia.
Hey – just read your comment, as I’m researching how Gav did his rain barrel.
I’d ignore the laws and just do it anyway! Are you in a free country or a prison? They’re ridiculous.
We’ve never asked anyone if we can have chooks or do any of the “embellishments” on our property – we just go ahead and do them (I’m in New Zealand). No-one has ever said anything or complained. The laws won’t change until someone challenges them.
As an aside, I *do* know that quails are usually under the same laws as canaries. Have you considered keeping them for eggs instead?
Good luck on your move to Australia, but hey, we’ll welcome you in New Zealand if you decide the Aussie climate is a bit hot!
Hi UsefulMom,
Thanks for dropping by the blog and the kind words. There are quite a few bloggers and like minded people for that matter who are trying to live a little bit more sustainably and frugally here, without the restrictions of Home Owners Associations (thank goodness). I hope you all get transferred, as I know you will love it in Australia.
Gav x
I love your ‘how to’ post Gavin. You are going to be set for water, this Summer.
Great job and your timing couldn’t have been better! I hope you caught a heap of rain from last nights storm 🙂 and that it didn’t do too much damage to your veggies,
Erica
Awesome post. Thanks for sharing all the details. That is another job on my list to do and seeing as how my son and I will be doing it ourselves it is great to have a ‘mentor’ to follow. We go to get our firebricks and ready cement today for the pizza oven. Lots of rain here in Launceston at the moment. My son and I now love it when it rains…for the veges and fruit trees. My son was so inspired he built himself a large green house. He is 18 and is excited by his watermelons, cucumbers and tomatoes.
Water Storage Tanks
Our Water Storage Tanks is unbreakable, Flexible and light in weight and all type of Tanks Supplier, Wholesalers, exporters & manufacturers in India.
Great job! Lucky you had Dad to help. We have the same rainwater diverter on our tank. Imported from Australia – apparently SA can’t design or manufacture anything so brilliant. 🙂
fantastic post, the pictures really hlp to see how you are doing it all
Thanks for the tips on rain barrels. I’ve got to figure out how to collect water off the chook shed roof for our auto watering system for our chookies now! Your tips have been very useful.
Cheers.